目录:
本方法只适合小网站,主要是好玩。Raspberry Pi不是很合适需要实时控制的系统(比如,飞行器,遥控小车),因为Linux内核要多任务,应用程序的优先级不能保持最高,会带来延时,但做些实时性要求不高的系统还是可以的。
硬件安装
需要以下硬件:
GPIO接口

用杜邦线将上图的3.3V输出和GPIO 23引出(板子正面朝上,GPIO引脚在左上角),将电阻和LED串联起来(电阻防止LED电流过大烧掉),注意二极管的两根脚不一样长,长脚的接正级,这样GPIO 23如果输出高电平,二极管就不发光了,输出低电平就亮啦!
都接好了后的样子如下:

GPIO接口编程
WiringPi
An implementation of most of the Arduino Wiring functions for the Raspberry Pi。 代码地址在: https://github.com/wiringPi
安装:
git clone https://github.com/WiringPi/WiringPi
cd WiringPi/wiringPi
sudo make install
让二极管闪一下的示例代码:
#include <wiringPi.h>
#include <stdio.h>
#include <stdlib.h>

int main (int argc, char* argv[])
{
	int pinNumber = 4;
	if (-1 == wiringPiSetup()) {
		printf("failed to setup wiringPi");
		return 1;
	}
	pinMode(pinNumber, OUTPUT);
	digitalWrite(pinNumber, 1);
	delay(200);
	digitalWrite(pinNumber, 0);
	delay(200);
	return 0;
}
WiringPi也有Python, Perl, PHP, Ruby的接口包装,按这里,怎么没有Go的呢。。。
RPi.GPIO
这是GPIO的Python库,地址在:https://pypi.python.org/pypi/RPi.GPIO 这里建议用python2,原因是web.py还不支持python 3 …
pacman -S python2
pacman -S python2-distribute
easy_install RPi.GPIO
让二极管一直闪的示例代码:
import RPi.GPIO as GPIO
import time

PORT = 16

GPIO.setwarnings(False)
GPIO.setmode(GPIO.BOARD)

GPIO.setup(PORT,GPIO.OUT)

while True:
    GPIO.output(PORT,True)
    time.sleep(0.2)
    GPIO.output(PORT,False)
    time.sleep(0.2)
Webiopi
项目地址: http://code.google.com/p/webiopi/ 这是一个使用RESTful API控制Pi的GPIO接口,文档丰富,使用起来非常简单。
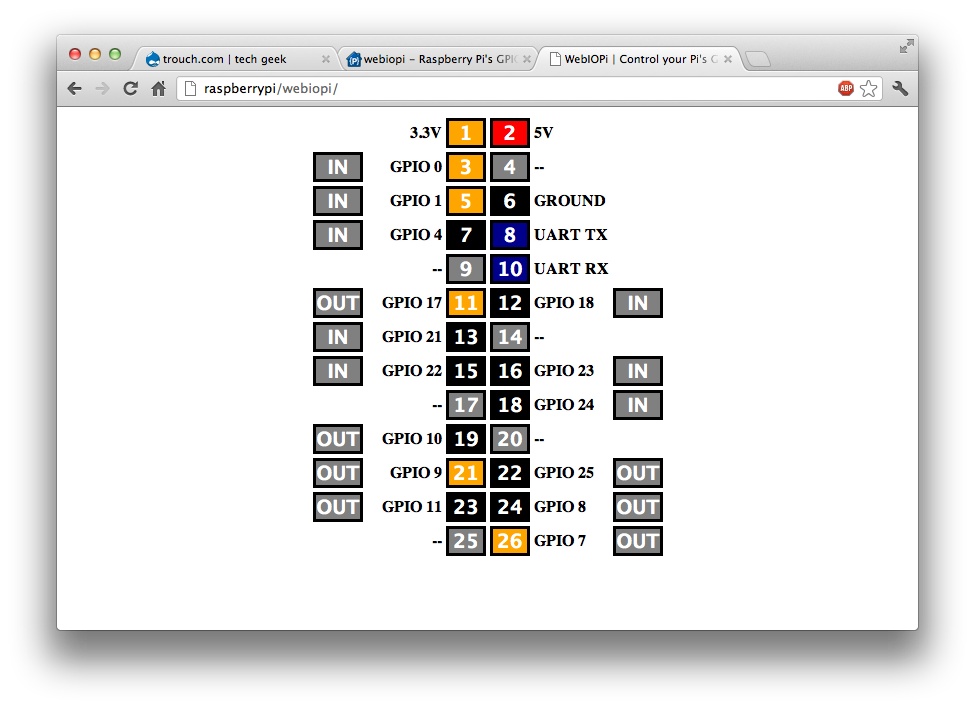
安装好后,用命令python -m webiopi启动,用浏览器打开 http://webiopi:raspberry@raspberrypi2:8000/webiopi/ 可以看到控制界面,其中有GPIO 26个引脚的状态(输入输出,高电平或低电平),用鼠标点端口还可以修改数据:

完成的代码
最后用一小段代码来实现最初的想法,这段代码可以较实时的处理QPS<=3的网站流量,如果流量较大则会滞后反应。。。
hugo@raspberrypi ~/bin $ cat traffic_led.sh
#!/bin/sh

tail -F /mnt/usb/logs/nginx/access.log  | grep --line-buffered "GET / HTTP" | while read LINE; do  {
   #echo $LINE
   curl -s --data "" "http://webiopi:raspberry@raspberrypi2:8000/GPIO/23/value/0"
   sleep 0.2
   curl -s --data "" "http://webiopi:raspberry@raspberrypi2:8000/GPIO/23/value/1"
   sleep 0.1
}
done
类似的还可以用这个方法来提醒:来自某某某的新邮件到了,Github有Pull Requests了。。。,或者网站挂了。。。